Monday, July 29, 2013

First Day of School Foam Numbers

For the first day of school, I wanted to take pictures with the kids holding something to show what grade they were in. I looked for something cute on Pinterest, but all I could find were printouts that I thought were boxy and covered up the kid's whole body when they held them up. I wanted something bright that was big enough to see, and that wasn't too distracting. I decided to use big pieces (12 x 18 inches) of craft foam from Hobby Lobby. I let the kids each choose their favorite color. I looked at fonts on my computer and chose a different one for each kid. Then I just drew the number on the foam with a pencil, eye-balling it. If you aren't as confident sketching it on, you could always print out a number in a large font. I didn't want to take that long, and I wanted the numbers to be pretty big, so I just winged it. After drawing them on, I just cut them out, making sure to keep the superscript contraction intact with the number. 

And done! The kids were excited to take their first day of school pictures!


Thursday, November 10, 2011

Handmade Christmas Ornament Swap!

Link
Stef over at It's All in my Head is hosting a handmade ornament swap! I am definitely going to do this next year. Better hurry, there are only a few spots left!

Sunday, October 30, 2011

Sally from Nightmare Before Christmas

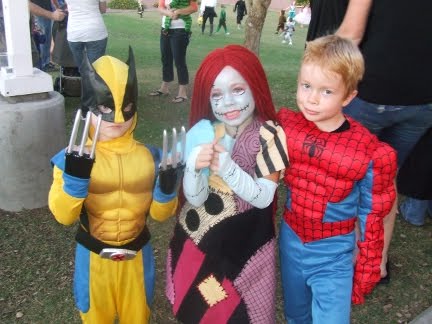
I wish I would have had the foresight to have taken pictures of this project along the way, but I'm just lucky to have finished it before our church Trunk-or-Treat on Saturday!

My daughter wanted to be Sally Stitches, so I went straight to work on this elaborate costume! It took me longer than I thought it would. First, I made a dress out of muslin by tracing the shape of one of my daughter's existing dresses. I looked at plenty of pictures of Sally online to see just what her dress looked like. I had most of the fabric on hand, but I ended up buying some corduroy for half off at Joann's to fill in the gaps and add some texture. I drew the shapes directly onto the muslin and cut pieces to fit out of the different fabrics. I used some Heat and Bond to attach the different pieces to the muslin dress. Then I zig-zagged around each different piece to secure it.

Next I took some black yarn and a needle and stitched marks around each of the pieces. This took me a while. I cut the sleeves and painted black lines on the yellow one with fabric paint. I attached the sleeves to the dress last.

I made the wig with two skeins of thick rust-colored yarn. I could have just sprayed her hair red, but I really thought that the yarn wig would look cool. I cut the two skeins into long strips, then carefully sewed them right in the middle onto a leftover piece of thick interface. Then I sewed a piece of elastic to go around her head and attached the interfacing to it in the front and the back. I added some elastic to the sides as well, so it wouldn't slide from side to side. If you are interested in seeing how I did it, I can take some pictures.

Last, I made the legs and arms. I dyed two pairs of white tights to a light blue color. I then cut some cardstock into strips and fed them into the legs so I could paint the stitches on. I just used puff paint and they dried really quickly. Then I flipped them over and did the other side. For the arms, I cut the legs off the tights and cut holes for her fingers to go through.

We used NYX Baby Blue Jumbo Eye Pencil and Cool Blue eye shadow for her face and neck. I put some pink eye shadow on her eyes and used an NYX white Jumbo Eye Pencil for under her eyes. I used a black eyeliner for the stitches. We finished her off with mascara and pink lips.

Wednesday, October 5, 2011

Yarn Wreath

I LOVE wreaths! I have been so into yarn wreaths especially lately. They are super easy to make and easy to customize. I loved the color combination on this one, especially the gray and mustard. Perfect for Fall.
The wreath is really easy to make, although it can get tedious. This is a great project to do in front of the TV. I grabbed one of those raffia-type wreaths in plastic and kept the plastic on. I ended up rolling my yarn skeins into balls first to make it easier to wrap the yarn around the wreath. I made sure there was enough yarn covering the area I wanted to do, then pulled it tight and knotted it well. Then I just snipped the ends. You can see the back here.
When I was done wrapping the yarn, I made a variety of flowers out of wool felt (not craft felt) and hot-glued them right on the wreath. Easy!

Monday, September 12, 2011

Another Color Swap

Robyn is doing another color charm swap, but this time in lovely fall colors. I made my zig zag quilt top with squares from her last color swap. There are lots of things you can do with your squares!

Click here to check out her post and sign up! She still has a few spots left!

Monday, August 15, 2011

A New Quilt

School is back in session for us here in Arizona, and I have been so ready! We have had a fun summer. I haven't sat at my sewing machine once since it started. It was nice to have a break.

I decided to do something with a stack of rainbow squares that I had from a friend's swap. I had 200 different squares, but instead of them being I-Spy prints, they were just a nice spectrum of color. I didn't know what to do with them, and I didn't want to do another patchwork, so I decided to try Crazy Mom Quilt's zig zag quilt. I loved her tutorial and found it super easy to follow. Plus, it yielded such great results! And this would make a great I-Spy quilt for I-Spy fabrics with smaller objects on them.
I wanted to map out the colors in kind of a mosaic look. I didn't think I liked it at first, but I think I really do now. Now to just add sashing and borders and send it off to be quilted! I will have to post the finished quilt when I get it back.

By the way, would anyone be interested in participating in a swap for colored fabrics like these?

Wednesday, June 8, 2011

Swap Link!

Hello all! Sorry I have not been blogging lately, but whenever crafting and sewing and blogging feel like work, that's when I take a break. Summer is here, and I'd much rather be spending time with these rascals than at my sewing machine making pretty things to post about. I know you all understand :)

I wanted to let you know that Fabiola over at Sassy Crafter is doing an I-Spy Swap, so just head on over there and join! Click here.